|
| Special Features |
Image Stabilization
Causes of Camera Shake
Diagnosing Camera Shake
Preventing Camera Shake
Using Image Stabilization
How It Works
Night, Ultraviolet, and Infrared Photography
Night Photography
Camera Sensitivity and Noise
Exposure and Focus
Taking Your Best Night Shots
Ultraviolet Photography
Infrared Photography
What You Need
IR Considerations
Time-Lapse Photography
TradeBonanza - Trader's Daily Digest | Financial Comic Strips |
Special Features
All digital SLRs have special features that you’ll need to master before you can become truly proficient with your camera. These range from image stabilization to time-lapse photography, which can improve your photos or give you whole new avenues of picture taking to explore.
Some special features aren’t intentional. For example, dSLR manufacturers go to great lengths to reduce the amount of infrared illumination reaching your sensor, because too much light in the long wavelengths can reduce the quality of your image. However, enough IR sneaks through to make infrared photography possible with most digital cameras, opening up one more door to creativity.
This section describes some of the special and optional features available for digital SLRs, and I hope it will spark your interest enough that you’ll explore some of them once you’ve mastered all the other features of your camera. |
| Back to top |
Image Stabilization
Camera shake is one of the banes of photography at all levels. It doesn’t matter whether you’re a tyro shooting a film or digital point-and-shoot, a serious photo enthusiast looking to express bottled-up creativity with photography, or a seasoned pro who should know better: Over the entire spectrum of users, as many images are “lost” through camera-induced blur as through poor exposure or bad focus.
Amateurs bring me their photographs asking how they can make them “sharp and clear” and a quick glance is enough for me to tell them not to “punch” the shutter button. I’ve seen examples of camera shake so egregious it was possible to tell whether an aggressive downward stroke on the shutter release was vertical or slightly diagonal. You’d think automated point-and-shoot cameras would set a shutter speed high enough to prevent these blurry pictures, but, as you’ll see, that’s not always possible. As light levels drop, so do shutter speeds, and blur is an inevitable result.
More serious photographers who pride themselves on the ability to hand-hold their cameras and get sharp images at 1/30th second or slower are sometimes shocked at how much sharpness they’ve actually lost when they compare their hand-held shots with those taken at the same settings using a tripod or other steadying aid. Of course, a hand-held shot may be good enough for its intended use, or even better for artistic or practical reasons than one taken with a tripod.
The chief difference between photographic neophytes and experienced photographers when it comes to camera shake is that the veterans are equipped to recognize the problem (usually) when it occurs, and take corrective measures. Photo enthusiasts will know enough to brace the camera by digging their arms into their sides, using a handy nearby support such as a ledge or fence, or switching to a higher shutter speed.
Camera and lens manufacturers are starting to come to the aid of all of us by producing products with features that are called, variously, image stabilization, vibration reduction, or antishake, and which make themselves known in product names by acronymic appendages like IS (image stabilization), VR (vibration reduction), or AS (anti-shake). No insult is intended towards Nikon, Minolta, and other vendors of these anti-blur technologies, but for the purposes of this chapter I’m going to adopt Canon’s terminology and call it image stabilization, or IS. In any case, Canon was the first to introduce this feature, back in the 1990s. Some form of IS is now found in many lenses, built right into cameras (with Minolta pioneering this approach), and into other kinds of products, including binoculars.
Causes of Camera Shake
Sharpness-robbing camera shake is insidious because it can come from so many sources. Punching the shutter release, as rank amateurs (as well as careless photographers with more experience) do, can jar the entire camera, often producing motion in a downward or diagonal direction sufficient to blur the image when slow shutter speeds are used. A more gentle finger on the release can eliminate some of the worst problems.
The normal, inevitable motion of the hand during a longer exposure can also produce camera shake. Some people have an almost imperceptible amount of tremor in their grips that is not caused by serious problems in the brain, my neurologist assures me. But the steadiest hands will tremble slightly, and the results will show in photographs taken with a normal or wide-angle lens at 1/30th second, or even, amazingly, at 1/125th second.
Shakiness can be exacerbated by several other factors. A camera or camera/lens combination that is poorly balanced is prone to additional camera shake. Turning the camera from a horizontal to a vertical orientation can produce more shake if the rotated grip is uncomfortable, or if there is no second “vertical” shutter release and the photographer’s hand is forced into an awkward position.
Camera shake is magnified by longer focal lengths. It’s bad enough that a long telephoto will induce vibration by making the camera front-heavy. But vibrations that are almost imperceptible when shooting photos with a 25mm lens will be seemingly magnified 10X at 250mm. The rule of thumb that suggests using a minimum shutter speed that’s the reciprocal of the focal length of the lens (e.g. 1/250th second with a 250mm lens) is a good one, even if it doesn’t go far enough.
Enlarging your photo to extremes can produce the same magnification effect. Figure 10.2 shows both telephoto and enlargement induced blur in a single pair of shots. The image at top of a distant ultralight aircraft was taken with a 400mm lens on a dSLR with a 1.5 lens multiplier effect, so the magnification caused by the multiplier crop was the equivalent of using a 600mm lens. I further cropped out only the center section of the final photo in my image editor, producing even more magnification. A shutter speed of 1/750th second wasn’t fast enough to eliminate the camera shake in this case. (The ultralight aircraft itself was moving very slowly, so the shutter speed was enough to freeze that motion.)
The version at the bottom of the illustration was taken at 1/2,000th second, when the craft began to make a turn (which you can tell by the slightly changed shape of the wing) and appears to be much sharper.
One final cause of camera shake is the internal motion of the camera’s innards as the photograph is taken. For digital SLRs, the one source that’s a proven culprit is the slapping of the mirror as it flips up out of the way prior to the opening of the shutter. This kind of vibration can happen even when the camera is firmly mounted on a tripod, and the photographer takes himself or herself out of the movement equation by using a shutter release or remote control to trigger the exposure. The solution here is to lock the mirror up before taking the picture.
Not all dSLRs offer mirror lock-up, however, but, fortunately, mirror vibration is not a concern in most picture-taking situations. It’s likely to cause some effects under extreme magnifications (with very long lenses), or for close-up pictures with longer exposures. There’s a longer discussion of mirror-caused vibration in Quircks and Strength section.
Diagnosing Camera Shake
The big shocker for many experienced photographers is that the recommended minimum shutter speed is not a panacea. The only true way to eliminate camera shake is to prevent the camera from shaking. If that’s not possible, one of the image stabilization technologies available from camera vendors will probably help.
Most photographers are surprised to learn just how much camera shake they fall victim to even at “high” shutter speeds. Even the steadiest hands are likely to see some camera shake in their photos at 1/125th second, or even higher, if only under extreme magnification. It may be virtually invisible in normal picture-taking circumstances, but it’s there. Very serious camera shake is easy to diagnose.
There are four possible causes for a blurry photo (and don’t forget that some pictures can contain elements of all four causes):
■ The picture is out of focus.
If you or your camera’s autofocus mechanism goofed, some of your subject matter, or in the worst cases all of it, will be out of focus and blurry. You can spot this kind of blur by looking at pinpoints of light in your image. Absent camera shake or subject movement, fixed spots of light will be enlarged and blurry, but will maintain their shape.
■ The subject was moving.
You can tell if subject movement is the main cause of image blur if the subject itself is blurry, but the background and surroundings are not.
■ You zoomed during the exposure.
Racking the zoom lens in or out during a long exposure is a time-honored special effect, but it’s easy to do it accidentally. You’re zooming in on an interesting subject and happen to press the shutter release on impulse before the zoom is finished. If your zoom movement is fast enough, you can see this effect in exposures as long as 1/60th second. Points of light will move inward towards the center of the image or outward as the magnification decreases or increases while you zoom.
■ Your camera shook.
The final primary cause of a blurry photo is camera shake. You can spot this kind of blur by looking at spots of light or other objects in the picture. They’ll be deformed in the direction of the camera shake: up and down, diagonally, or, in the worst cases, in little squiggles that show that the camera was positively trembling.
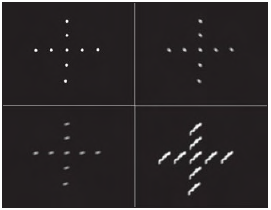
If you want a measurable way of seeing just how badly camera shake affects your own photos, it’s easy to construct a diagnostic tool. Get yourself a large piece of aluminum (aluminum foil will do in a pinch) and poke some tiny holes in it using a pattern of your choice. I prefer a cross shape because that simplifies seeing blurs in horizontal, vertical, and diagonal directions; the cross pattern doesn’t interfere with the blurs you produce.
Then mount the sheet 10 to 20 feet away and back-illuminate it so the tiny holes will form little dots of light. The correct distance will depend on the focal length of the lens or zoom you’ll be testing. You want to fill the frame with the testing sheet. Focus carefully on the sheet, and then take a series of exposures at various shutter speeds, from 1/1,000th down to 1 full second. Repeat your test shots using various methods of steadying yourself. Brace the camera against your body with your arms. Take a deep breath and partially release it before taking the photo. Try different ways of holding the camera.
Then, examine your test shots. As the shutter speed lengthens, you’ll notice that the tiny circles in the aluminum sheet will become elongated in the vertical, horizontal, or diagonal directions, depending on your particular brand of shakiness. You may even notice little wavering trails of light that indicate that you weren’t merely shaking but were more or less quivering during the exposure.
You’ll probably be shocked to discover some discernable camera shake at shutter speeds you thought were immune. With a normal lens, you might find some blur with hand-held shots at 1/125th second; with short telephotos, blur can be produced at 1/250th or shorter exposures. Figure below shows some typical results.
Preventing Camera Shake
The least expensive way of countering camera shake is to hold your camera steady. You probably don’t want to carry a tripod around with you everywhere, but there are alternative devices that are easier to transport, ranging from monopods to the C-clamp device shown in Figure 10.8. I carry mine with me everywhere; it fits in an outside pocket of my camera bag and can be used to convert anything from a fence post to a parking meter into a tripod-like support. It even has a sturdy screw fitting so you can attach it to utility posts or other wooden objects.
Lacking any special gear, you can simply set your camera on any available surface and use your self-timer to take a shake-free picture.
The two versions shown below were taken with the camera hand-held (left) and with the camera resting on top of a trash receptacle (right). Sometimes you can rest a long lens on a steadying surface to reduce the front-heavy effect. Veteran photographers carry around bean-bags they can place on an object and use to cradle their long lens gently. Another trick is to attach a strong cord to the tripod socket of your lens (most telephotos have them) with a tripod fitting, loop the other end of the cord around your foot, and pull it taut, adding some stability to your camera/lens combination.
You can also follow any of the well-known prescriptions for holding your body more steady, such as regulating your breathing, bracing yourself, and, above all, not punching the shutter release. 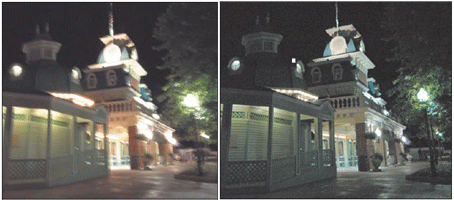
Using Image Stabilization
Your camera may be able to help stabilize your images. One of the most popular features of some current cameras and lenses is hardware stabilization of the image. By countering the natural (or unnatural) motion of your camera and lens, IS can provide you with the equivalent of a shutter speed that is at least four times faster, effectively giving you two extra stops to work with. That can be important under dim lighting conditions.
For example, suppose you’re shooting in a situation with a 400mm lens that calls for a shutter speed of 1/500th second at f2.8 for acceptable sharpness. Unfortunately, you’re using a zoom lens with a maximum aperture at that particular focal length of only f5.6. Assume that you’ve already increased the ISO rating as much as possible, and that a higher ISO either isn’t available or would produce too much noise. Do you have to forego the shot?
Not if you’re using a camera or lens with IS. Turn on your IS feature, and shoot away at the equivalent exposure of 1/125th second at f5.6. If the image stabilizer works as it should, blur caused by camera shake should be no worse than what you would have seen at 1/500th second. Your picture may even be a little sharper if your lens happens to perform better at f5.6 than a faster lens at f2.8 (which isn’t uncommon).
There are some things to keep in mind when using image stabilization:
■ Image stabilization mimics the higher shutter speed only as it applies to camera shake. It will neutralize a wobbly camera, but won’t allow you to capture faster-moving objects at a slower shutter speed. If you’re shooting sports with IS-enabled gear, you’ll still need a shutter speed that’s fast enough to freeze the action.
■ Some image stabilizers produce worse results if used while you’re panning. The intentional camera movement may confuse the IS, or provide only partial compensation, so you’ll end up with a picture that is not as good as if IS were switched off. Not all equipment suffers from this problem, however.
■ Image stabilization can slow down your camera a little. The IS process takes some time, just as your autofocus and autoexposure do, but unlike either of those, does not necessarily cease when you partially depress the shutter release. Image stabilization can produce the equivalent of shutter lag, and, oddly enough, may not work as well as you think for sports photography. IS is great for nature photography, long-range portraits, close-ups, and other work with subjects that aren’t moving at a high rate of speed, but less suitable for fast action.
■ Remember that image stabilization can be used for applications besides long-range telephoto or close-up photography, and doesn’t require macro or tele settings to be of benefit.
For example, if you find yourself in an environment where flash photography is not allowed, such as a museum or concert, IS can be a life-saver, letting you shoot with normal or wide-angle settings at shutter speeds as slow as 1/4 second. Nikon’s 24mm to 120mm AFS-VR optic is an example of a “walking around” lens that’s ideal for many ordinary picture-taking situations in which a slower than optimum shutter speed is desirable.
How It Works
There are several ways of achieving image stabilization. Some electronic video cameras use an electronic form of IS by capturing an image that’s slightly larger than the final frame and shifting the pixels in the proper direction to counter the motion of the camera; then saving the displaced pixels as the final image for that frame, repeating the process many times each second. This works, but is not the ideal method.
Optical image stabilization is better. Gyros in photographic equipment sense the slight movements of the camera and lens, and use prisms or adjustments in several “floating” lens elements to compensate. The glass can be shifted along the optical axis to cancel undesired lens movement and vibration.
Minolta pioneered a system built into the camera, rather than the lens, in which the sensor is moved in response to camera motion. The advantage of this method is that you don’t have to purchase a special lens that incorporates IS; Minolta’s anti-shake technology is in the camera and therefore works with (almost) every lens you use. (Minolta’s system isn’t compatible with every lens it produces.) If you like working with lots of different lenses and don’t want to purchase an array of IS-enabled optics, this approach has its advantages.
I mentioned earlier that image stabilization can become confused by intentional panning of the camera, and produce inferior results. Some lenses, including several models from Canon, incorporate two IS modes, including a special one for panned images. |
| Back to top |
Night, Ultraviolet, and Infrared Photography
Some digital SLRs and SLR-like cameras have features that lend themselves to some exciting fields of photography, including night, ultraviolet, and infrared imaging. Not all cameras are suited for each of these, so I’m going to provide a quick discussion of each type to help you decide if you want to explore these fascinating avenues of experimentation.
Night Photography
We've actually covered most of what you need to know about night photography in other portions of this site, but there are some new tricks to learn about, and a few new considerations to ponder. Here are some of the things to think about.
Camera Sensitivity and Noise
Higher ISO settings mean you can take some pictures at night in relatively well-lit locations hand-held, and if you must use a tripod, boosted sensitivity settings can lead to shorter exposures. Sometimes you’ll want longer exposures to create streaking or ghost effects, but other times you’ll want to use a reasonably short shutter speed, if only to increase the number of shots you can take in a given timeframe.
If your camera offers ISO settings higher than ISO 800 (some well-known dSLRs don’t), you can go to ISO 1,600 or ISO 3,200 to cut your shutter speeds drastically, or, keep the same speed and use a smaller, more forgiving f-stop. You may be able to “cheat” and fake higher ISOs if you’re willing to experiment.
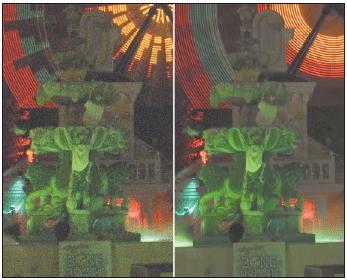
When shooting at higher ISO settings, make sure that your camera’s noise reduction feature is sufficient to cut down on that noxious, multicolored hash that results from boosted ISOs. (You’ll find a discussion on the causes and effects of noise in Digital SLR Technology section.) Too much noise in an image can render it useless.
As you’ll recall from earlier in this book, noise reduction involves the camera taking a second, blank exposure, and comparing the random pixels in that image with the photograph you just took. Pixels that coincide in the two represent noise and can safely be suppressed. Most noise reduction systems effectively double the amount of time required to take a picture, and are applied only for longer exposures (typically those that are one second or more). The extra time comes from the follow-up, dark frame that’s exposed for the same length of time as your original shot. A warning will probably appear in your dSLR’s viewfinder, telling you the cause of the delay. This form of noise reduction, also called dark frame subtraction, can be turned on and off, so you can apply it only when you need to. Figures below shows a pair of images shot at ISO 1,600. The one on the left was taken with noise reduction turned off; the version on the right uses in-camera noise reduction.
You can also apply noise reduction to a lesser extent when converting RAW files to some other format, using your favorite RAW converter, or an industrial-strength product like Noise Ninja (www.picturecode.com) to wipe out noise after you’ve already taken the picture.
Exposure and Focus
Determining the correct exposure for night photography can be tricky. Your dSLR’s autoexposure system will probably do a good job, but can still be thrown off by bright lights or other deceptive parts of your scene. It’s a good idea to bracket your exposures when shooting at night, to increase your chances of getting one that’s just right. Keep in mind that the phenomenon known as reciprocity failure (discussed earlier in the book) will mean that, with extended exposure times, leaving the shutter open twice as long won’t give you twice as much exposure. Focus can also be problematic if you’re shooting subjects that are closer than 10 feet or so. Generally, night scenes are taken at a distance, so manual focusing at infinity can do the trick.
Taking photos at night of closer subjects means your camera had better have a focus-assist light or other system for focusing under dim illumination. It’s likely your dSLR’s optical viewfinder won’t be usable if it’s really dark.
Taking Your Best Night Shots
Sony has pioneered a technology called Night Shot, used in both its camcorders and Cybershot digital cameras, to allow taking pictures in what Sony claims is total darkness. Of course, it’s not really absolutely dark: Sony’s system takes advantage of the infrared sensitivity of its CCD sensors to produce images by long wavelengths of light that we can’t see. Like virtually all digital cameras, Sony’s Cybershot models include an IR Cut Filter (ICF) to reduce the CCD’s sensitivity to infrared and ultraviolet light. That’s a great idea for pictures taken under full daylight, because these wavelengths can degrade the image and modify the relationships between the colors we see.
In Night Shot mode, the cutoff filter is swung out of the way, allowing all the wave lengths of light to reach the sensors. That increases the sensitivity of the camera at night, making it possible to take photos when there is too little light to see by.
Ultraviolet Photography
Ultraviolet photography with digital SLRs is largely undiscovered country, but one worth your exploration, because some interesting effects can be produced by the unexpected way some subjects absorb or reflect ultraviolet light. You’ll find many challenges in your path, including the fact that the sensors in digital cameras are not very sensitive to UV light, and the lenses used with them are very good at filtering UV out. You can purchase a special lens produced especially for UV photography (made of a phosphate glass, and used for specialized medical and scientific applications). Expect to pay thousands of dollars for one, if you can even find an example for sale.
The problems are not insurmountable. Andrew Davidhazy at the Rochester Institute of Technology has done some interesting experiments with the Canon Digital Rebel, using an 18A ultraviolet transmitting filter. He’s gotten some strange, but fascinating results photographing Black Eyed Susans, sunflowers, and buttercups. Find his Web page on the topic at www.rit.edu, and see what happens when a world-class creative mind starts fooling around to see what will happen.
Infrared Photography
Infrared imaging is one type of photography that holds a little more promise. Although digital cameras include an infrared-blocking filter, or “hot mirror,” enough infrared light leaks through to make it possible to take pictures by the wavelengths that remain. You’ll need a special filter and long exposures, but infrared photography is entirely practical with a dSLR.
But first, a warning. As a dSLR owner, you’ll be shooting blind! As I mentioned earlier in this site in Quircks and Strength section, because the infrared filters you’ll use block visible light, your optical viewfinder will appear to be totally black, and, of course, your LCD can’t be used for previewing pictures.
Still, infrared pictures look cool because your subjects, particularly plant-life, absorb or reflect infrared light in proportions that are different from what you see with visible light. The tonal relationships can be wildly weird, with black skies and white foliage. People will appear pale and washed out, perhaps even ghastly. Indeed, because infrared photography is not particularly people-friendly, it’s most often used for landscapes and scenic photos.
A side effect of infrared imaging is that the photos tend to look grainy and soft in focus, because of the different way in which your lens and camera handle IR illumination. Most of the time, you’ll want to convert your infrared images to grayscale, but some interesting color effects can be achieved, too. Figure below shows an infrared image that’s been converted to monochrome.

You can also get some “color” infrared effects through a process known as channel swapping. After you’ve produced your infrared photo, apply your image editor’s auto-levels control to adjust tonal values. Then exchange the red and blue values by editing each of those two channels separately. In Photoshop, use the Channel Mixer to edit the Red channel, moving the Red slider to 0 percent and the Blue slider to 100 percent. Then, do the opposite to the Blue channel, changing its Red slider to 100 percent, and its Blue slider to 0 percent.
You can end up with a photo like the one shown in the next figure, where the sky is blue, but the foliage has a neutral white or faintly magenta appearance. 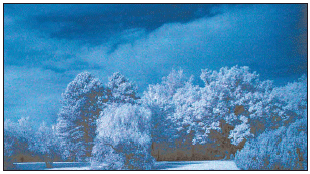
What You Need
You’ll need to use a digital SLR that doesn’t completely filter out infrared light with a hot mirror. An easy way to check for IR capability is to photograph your television remote control. Point the remote at your camera, depress a button on the remote, and take a picture. If your camera can register IR light, a bright spot will appear on the photograph of the remote at the point where the IR light is emitted.
Next, you’ll need an IR filter to block the visible light from your sensor. Find a Wratten #87 filter to fit your digital camera. You can also use a Wratten 87C, Hoya R72 (#87B), or try #88A and #89B filters. Your local camera dealer may let you try out several of these filters in the store to see which works best for you, which is a much better idea than purchasing one blind, because they can easily cost $100 or more. You’ll probably need to decide which of your lenses you’ll be using the IR filter with, because they are too expensive to purchase one for every filter size.
You’ll also need a tripod for most of your shooting, because IR photos typically require exposures of 1/15th second to 1/4 second, or longer, even under bright daylight. A tripod is also a good idea because you can line up your shot with the filter off (so you can view the image through the viewfinder), then fasten the IR filter without disturbing the camera position before you take your shot.
IR Considerations
Infrared photography requires some accommodations because of the way your camera works with long-wavelength light. Here are some things to keep in mind.
■ Light loss.
The IR filter blocks the visible illumination, leaving you with an unknown amount of infrared light to expose by. Typically, you’ll lose 5 to 7 f-stops, and will have to boost your exposure by that much to compensate. A tripod and long exposures, even outdoors, may be in your future.
■ Metering problems.
Exposure systems are set up to work with visible illumination. The amount of IR reflected by various subjects differs wildly, so two scenes that look similar visually can call for quite different exposures under IR.
■ Shooting blind.
Because the visual light is eliminated, you’ll be in a heap of trouble trying to view an infrared scene through a digital SLR. The LCD review may be a little weird, too.
■ Focus problems.
Infrared light doesn’t focus at the same point as visible light, so your autofocus system might or might not work properly. Lenses used to have an infrared marking on them that could be used in conjunction with the focus scale on the lens to correct the point of focus after you’d manually adjusted the image. Of course, we don’t use manual focusing much these days, so you may have to experiment to determine how best to focus your camera for infrared photos. If you’re shooting landscapes, setting the lens to the infinity setting probably will work (even though infrared infinity is at a different point than visible light infinity).
■ Lens coatings.
Some lenses include an anti-IR coating that produces central bright spots in IR images. A few Canon lenses fall into this category. Test your lens for this problem before blaming the artifacts on your filter or sensor.
■ Shoot in color.
Even though your pictures will be, for the most part, black and white, or, rather, monochrome (usually magenta tones or a color scheme described as “brick and cyan”), you still need to use your camera’s color photography mode. Experts in digital infrared photography recommend setting your camera’s white balance manually, using grass as your sample. That white balance will provide the best overall grayscale images in your final picture. If your camera allows it, save the custom white balance as a preset to use later on the next time you take infrared photos under similar conditions.
You’ll find lots more information on the Internet about digital infrared photography, including the latest listings of which cameras do or do not work well in this mode. If you ever tire of conventional scenic photography, trying out digital IR can respark your interest and give you a whole new viewpoint.
|
| Back to top |
Time-Lapse Photography
Who hasn’t marveled at a time-lapse photograph of a flower opening, a series of shots of the moon marching across the sky, or one of those extreme time-lapse picture sets showing something that takes a very, very long time, such as a building under construction?
You probably won’t be shooting such construction shots, unless you have a spare digital camera you don’t need for a few months (or are willing to go through the rigmarole of figuring out how to set up your camera in precisely the same position using the same lens settings to shoot a series of pictures at intervals). However, other kinds of time-lapse photography are entirely within reach.
Some digital cameras have the ability to schedule time-lapse delays built in, and I’m hoping this will become more common on dSLRs in the future. You might need to resort to an EVF camera or point-and-shoot camera to get the time-lapse flexibility you need. For example, the Olympus E-20 pioneered a nifty system that lets you take pictures at intervals ranging from every 30 seconds to once a day, for as long as your memory card and batteries hold out. (An AC adapter is always a good idea for time-lapse photos).
With dSLRs, you’re more likely to have to use methods like those found in Fuji and Nikon cameras, among others, which can shoot time-lapse pictures through computer software control, with the camera tethered to the computer using a USB cable. You can also trigger your camera using its infrared remote control, either to make manual exposures, or, like some enterprising souls we know, by programming a Palm Pilot to provide the trigger.
Here are some tips for effective time-lapse photography:
■ If you’re shooting a long sequence, consider connecting your camera to an AC adapter, as I mentioned earlier.
■ Unless your memory card has enough capacity to hold all the images you’ll be taking, you might want to change to a higher compression rate or reduced resolution to maximize the image count.
■ While time-lapse stills are interesting, you can increase your fun factor by compiling all your shots into a motion picture using your favorite desktop movie-making software.
■ If your camera will be set up for an extended period of time (longer than an hour or two), make sure it’s protected from weather, earthquakes, animals, young children, innocent bystanders, and theft.
■ Experiment with different time intervals. You don’t want to take pictures too often, or less often than necessary to capture the changes you hope to show in your images. |
| Back to top |
|