Getting Practical
Of course, macrophotography isn’t all about terms and definitions. You need to understand how to apply these concepts to your picture taking. This section will look at some of the practical aspects of shooting close-up images.
Lens Choice
The selection of a lens for macrophotography can be important because not all lenses do a good job of taking close-up pictures. Some, particularly zoom lenses with a long range, may not focus close enough for practical macro work. Others may not be sharp enough, or might produce distortion, color aberrations, or other image problems that become readily apparent in critical close-up environments. Or, you might find that a particular lens or focal length is not suitable because, to get the magnification you want, the lens itself must be so close to the subject that it intrudes on properly lighting the setup. Here are some things to think about:
Macro or General Purpose Lens?
Many general purpose lenses can be pressed into service as close-up optics and do a fine job if they have sufficient sharpness for your application and are relatively free of distortion. If you frequent the photography forums, you’ll see paeans of praise for this lens or that when used for macro shots. It’s entirely possible to work with a lens you already own and get good results. However, if you do a lot of close-up work, you’ll be happier with a lens designed specifically for that job. Such lenses will be exquisitely sharp and be built to focus close enough to produce 1:1 or 1:2 magnification without any add-on accessories.
Focal Length
Focal length determines the working distance between your camera/lens and the macro subject at a given magnification. As with most real-world decisions, the choice of focal length is necessarily a compromise.
To focus more closely, the lens elements of a general purpose or macro lens must be moved farther away from the sensor, in direct proportion to the magnification. (To simplify things, I’m going to assume we’re using a fixed-focal-length, or prime lens, rather than a zoom lens.) So, the optical center of a 60mm lens must be moved 60mm from the sensor (about 2.4 inches) to get 1:1 magnification. That’s a relatively easy task with a 60mm lens. To get the same magnification with a 120mm lens, you’d have to move the optical center much farther, 120mm (or almost 5 inches), to get the same 1:1 magnification. (As I mentioned in Working with Lenses section, the “optical center” can be somewhere other than the physical center of the lens; with a long lens, the optical center may be close to the front element of the lens.)
For this reason, most so-called “macro” zoom lenses actually produce 1:4 or 1:5 magnifications. There are specialized macro prime lenses for digital cameras in the 60mm, 80mm, 105mm, and 200mm range, but these are special optics and tend to be expensive. However, they might still be a better choice for you if you do a lot of close-up photography.
That’s because of the increased working distance the longer lenses offer. At extreme magnifications, a shorter lens may have the front element less than an inch from the subject. That introduces perspective problems and makes it difficult to get some light in there to illuminate your subject. Your camera may be so close to the subject that there isn’t room to light the front of the subject. Forget about your built-in flash: It is probably aimed “over” the subject and either won’t illuminate it at all or will only partially illuminate it, and may even be too powerful. Or, your lens may cast a shadow on the subject.
So, your choice of focal length may depend on the desired working distance and whether a particular focal length produces the perspective you need. Fugure below shows how a wide-angle lens can be used effectively for close-ups. 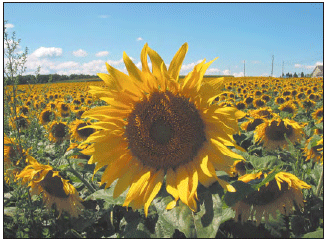
Depth-of-Field
The depth of sharp focus with three-dimensional subjects can be a critical component in macrophotography. You’ll find that depth-of-field is significantly reduced when you’re focusing close.
Although the relatively short focal length of the lenses used with digital cameras provides extra depth-of-field at a given magnification, it still may not be enough. You’ll need to learn to use smaller apertures and other techniques to increase the amount of sharp subject matter. A lens that has a wider range of f-stops, with, perhaps stops as small as f32 or even smaller, can be helpful to increase depth-of-field. Of course, you need to know that any DOF gains made with smaller f-stops can be lost to a phenomenon known as diffraction, which crops its ugly head as you stop down. (Diffraction is why most lenses produce their best results one or two f-stops from wide open, and actually lose a bit of sharpness as you stop down, even while depth-of-field increases.)
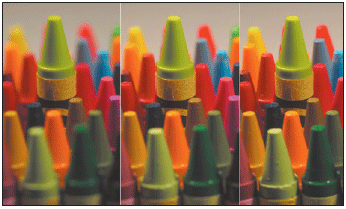
Next figures shows three different versions of a photo of an array of crayons, taken with a 60mm macro lens. In all three cases, focus was on the yellow-green crayon in the upper middle of the frame. The image on the left was shot at f4, the middle version at f11, and the one at right at f22. You can easily see how the depth-of-field increases as the lens is stopped down.
You’ll also need to learn how to use your available depth-of-field. Typically, the available DOF (which, as you’ve just seen, varies by f-stop) extends two-thirds behind the point of sharpest focus and one-third in front of it. Next figure shows the same crayons in a slightly different arrangement, all taken at f4. In the version at left, I’ve focused on one of the crayons in the front row. The middle shot, taken at the same f-stop, was focused on the middle crayon. The version at the right was focused on the rear-most row. With the lens almost wide-open, depth-of-field is so shallow that only the crayon focused on is sharp. I could use that creatively to apply selective focus, or I could have stopped the lens down, focused on the center crayon, and perhaps brought all of them into focus. 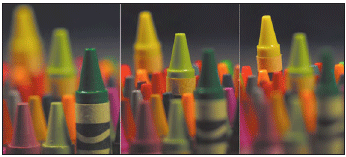
I also could have increased depth-of-field by changing angles so that more crayons were approximately the same distance from the lens. For the figure below, I cranked the tripod up a little higher and shot down from a different angle. The f-stop is still f4, but more of the crayons are in focus. 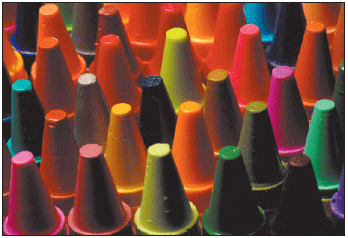
Perspective
As you just learned, close-up pictures can be taken from a relative distance (even if that distance is only a few feet away) with a telephoto lens or long zoom setting. The same magnification can also be achieved by moving in close with a shorter lens. The same apparent perspective distortion that results from using a wide-angle lens close to a subject and the distance compression effects of a telephoto apply to macrophotography.
So, if you have a choice of tele/wide-angle modes for macrophotography, you’ll want to choose your method carefully. Relatively thick subjects without a great deal of depth and those that can’t be approached closely can be successfully photographed using a telephoto/macro setting. Subjects with a moderate amount of depth can be captured in wide-angle mode. If you find that a wide setting tends to introduce distortion, settle for a focal length somewhere in between wide and telephoto. Figure below using close-up technique, light and a telephoto zoom set to macro mode to capture images of portions of the jug.
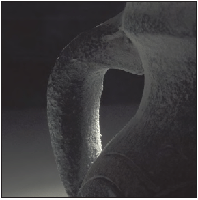
The most important types of subjects affected by perspective concerns are table-top setups such as architectural models and model railroad layouts. Use the right perspective, and your model may look like a full-scale subject. With the wrong perspective, the model looks exactly like what it is, a tiny mock-up.
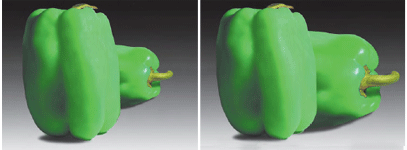
You can see the difference perspective makes by comparing the images at the left and right of the figure below. Objects that are closer to the camera appear proportionately larger in the wideangle shot at left compared to the version shot with the longer zoom setting at right. It’s most noticeable if you compare the pepper in front with the pepper in back in both photos. In the left version, the rear pepper looks smaller because it’s proportionately farther away thanks to the wide-angle perspective. In the right picture, the two peppers are more compressed together and similar in size. For a given magnification, you’ll want to choose the focal length of your lens carefully to provide the kind of perspective that you’re looking for.
Close-Up Gear
In addition to a close-up lens, there are other pieces of equipment that can come in handy for macrophotography, ranging from special close-up attachments that fit on the front of the lens, lens “extenders” that move the optical center of the lens farther away from the sensor, and accessories like ringlights that make illuminating your subject easier.
Close-Up Lenses
Close-up lenses differ from macro lenses, despite their confusingly similar names. Macro lenses, discussed earlier, are prime lens or macro zoom lenses designed to focus more closely than an ordinary lens. The add-ons that have traditionally been called close-up lenses are screw-on, filter- like accessories that attach to the front of your camera’s prime or zoom lens.
These accessories are useful when you want to get even closer than your camera’s design allows. They provide additional magnification like a magnifying glass, letting you move more closely to the subject. Close-up lenses, like the one shown in the figure below, are generally labeled with their relative “strength” or magnification using a measure of optical strength called “diopter.” A lens labeled “No. 1” would be a relatively mild close-up attachment; those labeled “No. 2” or “No. 3” would be relatively stronger. Closeup lenses are commonly available in magnifications from +0 diopter to +10 diopters. 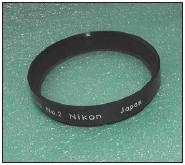
The actual way close-up magnification is calculated is entirely too complicated for the average math-hating photographer because there’s little need to apply mumbo-jumbo like Magnification at Infinity=Camera Focal Length/(1000/diopter strength) in real life. That’s because the close focusing distance varies with the focal length of the lens and its unenhanced close-focusing capabilities.
However, as a rule of thumb, if your lens, a telephoto, say, normally focuses to one meter (39.37 inches; a little more than three feet), a +1 diopter will let you focus down to one-half meter (about 20 inches); a +2 diopter to one-third meter (around 13 inches); a +3 diopter to onequarter meter (about 9.8 inches), and so forth. A +10 diopter will take you all the way down to about 2 inches—and that’s with the lens focused at infinity. If your digital camera’s lens normally focuses closer than one meter, you’ll be able to narrow the gap between you and your subject even more.
In the real world, the practical solution is to purchase several close-up lenses (they cost roughly $20 each and can often be purchased in a set) so you’ll have the right one for any particular photographic chore. You can combine several close-up lenses to get even closer (using, say, a +2 lens with a +3 lens to end up with +5), but avoid using more than two close-up lenses together. The toll on your sharpness will be too great with all those layers of glass. Plus, three lenses can easily be thick enough to vignette the corners of your image.
One of the key advantages of add-on close-up lenses is that they don’t interfere in any way with the autofocus or exposure mechanism of your dSLR. All of your lenses will continue to work in exactly the same way with a close-up lens attached. There are some disadvantages, too. As with any filters, you must purchase close-up lenses in sizes to fit the front filter threads of your lenses. You’ll either need close-up lenses for each filter size appropriate for the optics you want to use them with or use step-up/step-down rings to make them fit.
Finally, close-up lenses come at a sharpness penalty, especially when you start stacking them together to achieve higher magnifications. A photo taken with a close-up lens will be a little less sharp than one taken without. Next figure was taken with a zoom lens that didn’t focus close enough to capture the buds. I slapped a close-up lens on the front, and moved to within a few feet. 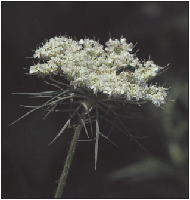
Extension Tubes and Bellows
One of the coolest things about digital SLRs is that if you can’t move the lens far enough away from the sensor to get the magnification you want, you can pop off the lens and insert gadgets that provide that extension for you. The simplest variety is called extension tubes.
These are nothing more than hollow tubes with a fitting on the rear similar to that on the back of a lens, and which connects to the lens mount of your camera. The front of the extension tube has a lens mount of its own, and your lens is attached to that. Extension tubes look a little like teleconverters (which increase the focal length of your lens), except they have no optics inside. They do nothing but what their name says: extend. Extension tubes are available in multiple sizes, often as a set, with, say, 8mm, 12.5mm, and 27.5mm tubes that can be used alone or in combination to produce the amount of extension needed.
Some tubes may not couple with your camera and lens’s autofocus and autoexposure mechanisms. That doesn’t preclude their use because you may be focusing manually anyway when you’re in macrophotography mode, and setting the f-stop and shutter speed manually may not be much of an inconvenience, either. Newer sets are compatible with your lens’s full set of features, except, possibly, image stabilization, making them even more convenient to use.
A bellows is an accordion-like attachment that moves along a sliding rail to vary the distance between lens and camera continuously over a particular range. Where extension tubes each provide a fixed amount of magnification, bellows let you produce different magnifications, as much as 20:1 or more. I favor an older bellows attachment, used with a correspondingly ancient macro lens.
It has a tilt and shift mechanism on the front column, which allows you to vary the angle between the lens and the back of the camera (where the sensor is). This shifting procedure can help you squeeze out a little more depth-of-field by tilting the sharpness “plane” in the same direction your subject matter “tilts” away from the camera. A bellows attachment, like the one shown in the next figure, frequently has a rotating mechanism that allows you to shift the camera from horizontal to vertical orientation. Some bellows have two rails: one for adjusting the distance of the lens from the camera, and a second that allows moving the whole shebang—bellows, camera, and all—closer or farther away from the subject. That allows it to function as a “focusing rail.” Once you’ve moved the lens out far enough to achieve the magnification you want, you can then lock the camera/bellows distance and slide the whole components back and forth to achieve sharpest focus. 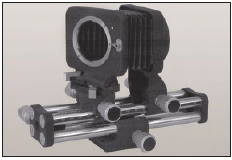
Be careful when attaching bellows or extension tubes to your camera to avoid damaging your lens mount or camera body. Even if a bellows is nominally compatible, you may have to attach an extension tube to the camera body first to allow the mechanism to clear projecting parts of the camera.
Of course, bellows, extension tubes, and similar attachments can be expensive, so you won’t want to make the investment unless you do a lot of close-up photography. Another downside is that the farther you move the lens from the sensor, the more exposure required. You can easily lose 2 or 3 f-stops (or much more) when you start adding extension.
Other Gear
You’ll probably need a tripod to support your camera during macrophotography sessions. Tripods steady the camera for the longer exposures you might need and allow consistent and repeatable positioning, which might be necessary if you were, perhaps, taking pictures of your toy soldier collection one figure at a time. Get a sturdy tripod with easily adjustable legs, suregrip feet, and a center column that lets you change the height over a decent range without the need to fiddle with the legs again. A center column that’s reversible is a plus because you can use it to point the camera directly down at the flower or shoot from low angles that are less than the minimum height of the tripod. A ball head, which lets you rotate the camera in any direction, is easier to use and more versatile than a tilt-and-swing type tripod head.
If you take pictures of small, flat objects (such as stamps, coins, photographs, or needlepoint), you might want to consider a special kind of camera support called a copystand. These are simple stands with a flat copyboard and a vertical (or slanted) column on which you fasten the camera. The camera can be slid up or down the column to adjust the camera-subject distance. A slanted column is best because it ensures that the camera remains centered over a larger subject area as you move the camera up. Copystands provide a much more convenient working angle for this type of photography, particularly if your digital camera allows swiveling the lens and viewfinder in different directions.
Although you can work with existing light, you’ll find your creative possibilities are broader if you use external light sources. Macro subjects other than living creatures will usually sit still for long exposures, so incandescent lighting—perhaps something as simple as a pair of desktop gooseneck lamps—may suffice.
Or, you can use electronic flash to freeze action. As I mentioned earlier, your dSLR’s built-in electronic flash isn’t ideal for macro work, so you should investigate external, off-camera flash units. Frequently, your camera’s internal circuitry may be able to trigger the same vendor’s external flash attachments by radio control. Or, you can set your internal flash to its very lowest power setting and use that to set off an external flash through a triggering device called a slave unit. In that case, the internal flash may provide nothing more than a little fill on your subject, with most of the illumination coming from the external flash.
There is also a device called a ringlight, which is a circular light shaped like a round fluorescent tube (and may in fact be one in its incandescent incarnation). A ringlight can solve your close-quarters illumination problems by providing an even, shadow-free light source at short camera/subject distances.
Consider using reflectors, umbrellas, and other light modifiers to optimize your lighting effects. A simple piece of white cardboard can work well and can double as a background. Aluminum foil or Mylar sheets can provide a bright, contrasty reflection source. I also use pure-white pocket rain umbrellas that cost me $5, but which unfold to 36 inches or more to create great, soft-light reflectors. If you want diffuse, omni-directional lighting for photographing things like jewelry, nothing beats a tent, which is an enveloping structure of translucent material that fits over your subject, with a hole to fit the lens through. Light can then be applied to the outside of the tent to illuminate your picture. You’ll find suggestions for making a tent out of a gallon milk jug in some other sites.
|

