Mastering Digital SLR Photography

Mastering
Digital SLR Photography

Introduction | TradeBonanza | Site Map | Resources
Working with Lenses
Lenses and dSLRs
      Digital Differences
            Some Sensors Are Smaller Than Film Frames
            Extreme Angles
            Reflections
      Lens Designs
      If It Ain’t Bokeh, Don’t Fix It
Understanding Lens Requirements
      Image Quality
      Lens Aperture
      Zoom Lenses
      Focusing
      Add-On Attachments
      Construction Quality
TradeBonanza - Trader's Daily Digest | Financial Comic Strips

Working with Lenses

In this chapter. It will tell you more than you need to know about lenses, but, then, you’re probably going to acquire more lenses than you need, anyway. There’s a little bit more detail on how lenses work (which will help you in selecting your next optic) and some advice for choosing the right lens for the job.

Back to top

Lenses and dSLRs

Most of the vendors who sell both film and digital SLRs, including Nikon, Canon, and Minolta, produce one line of optics that fit both their film-based and digital cameras. Some, such as Nikon and Olympus, have a second line of lenses that work only with digital SLRs. Olympus, in particular, with its “Four-Thirds” systems (see Digital SLR Techonolgy section), has pioneered a start-from-scratch, built-for-digital SLR product line.

Although you can use lenses designed for film SLRs on your digital SLR, there are good reasons not to. Lenses designed for digital cameras with sensors that are smaller than full-frame size can be made more compact and lighter. There are also some technical reasons why lenses designed for dSLRs can produce better results than “full-size” lenses. Of course, if you own a digital camera with a full-frame sensor, you have no choice. You must use the lenses offered by your vendor (or by third parties) for the film version. However, as you’ll soon learn, even if you do, you may not be working with lenses that are optimized for digital photography.

Digital Differences
Although lenses designed for film and digital use all operate on the same basic principles, sensors react to the light transmitted by those lenses in different ways than film does. Digital lens designs need to take those differences into account. Here are some of the key digital differences.

Some Sensors Are Smaller Than Film Frames
You already know about this. Because many sensors are smaller than the 24mm × 36mm standard film frame, lenses of a particular focal length produce what you think of as a larger image, but which is actually just a cropped version of the same image. No “magnification” takes place; you’re just using less than the full amount of optical information captured by the lens.

The most obvious result is the infamous lens multiplier factor. Because only part of the image is captured by the sensor, your cropped version appears to be 1.3, 1.5, 1.6, or even 2.0 times larger. (Nikon’s D2x has a high-speed burst mode that crops the already cropped image even further to produce a 2X lens multiplier.) While this multiplier factor can be, seemingly, a boon to those needing longer lenses, it’s a hindrance in the wide-angle realm. A decently wide 28mm full-frame lens becomes the equivalent of a 45mm normal lens when mounted on a camera with a 1.6X multiplier.

There are other ramifications. Because a smaller portion of the lens coverage area is used, the smaller sensor effectively crops out the edges and corners of the image, where aberrations and other defects traditionally hide. If you use a full-frame lens on a dSLR with a smaller sensor, you may be using the best part of the lens. This is nothing new; users of pro film cameras have a much more intimate knowledge of coverage circles. They know that, say, a 200mm telephoto lens for a 2 1/4 × 2 1/4 SLR like a Hasselblad may cover a square no larger than 3 × 3 inches, whereas a 200mm lens for a view camera may have an image circle that’s 11 to 20 inches in diameter.

Still, you’d probably be surprised to realize that an inexpensive 200mm lens developed for a 35mm film camera is a great deal sharper within its 24mm × 36mm image area than a mondoexpensive 200mm “normal” lens for a 4 × 5 view camera cropped to the same size. Because 4 × 5 film is rarely enlarged as much as a 35mm film image—or digital camera image—lenses produced for that format don’t need to be as sharp, overall. Instead they need to be built to cover larger areas.

Conversely, when creating a lens that’s designed to cover only the smaller sensor, the vendor must make the lens sharper to concentrate its resolution on the area to be covered. Olympus claims that its Four-Thirds lenses have double the resolution of similar lenses it builds for its 35mm cameras.

Of course, if the coverage area is made smaller, that can re-introduce distortion problems at the periphery of the coverage circle. This is particularly true of ultrawide-angle lenses, which are difficult to produce in short focal lengths anyway, including the 12mm–24mm zoom I favor.

Three figures below illustrate the coverage circle and cropping concepts more visually. Imagine three different 50mm lenses, each designed for a different kind of SLR camera. The magnification of each lens would be identical, but the coverage area would be different in each case.

A 50mm lens on a 6 × 6 cm SLR produces a wide-angle view from its generous coverage circle (left),The same 50mm focal length creates a “normal” viewpoint on a full-frame SLR, and requires less of a coverage circle (right), Lenses for digital SLRs with smaller sensors can be smaller and more compact, as with this 50mm lens that is the equivalent of a short telephoto(right)

For example, the first figure represents a 50mm lens used as a wide-angle optic on a 6 × 6 cm single lens reflex. The coverage area is just a little larger than necessary to cover the full frame. If it were any smaller, you can see that vignetting in the corners would result. At the right side of the illustration is the image that the camera crops out of the lens’s coverage area to produce a slightly wide-angle view.

The second figure might be a full-frame SLR, with a slightly smaller coverage area to produce a “normal” view from the 50mm lens. The third figure would correspond to a 50mm lens designed for a smaller sensor, and would have a commensurately smaller coverage area. The 1.5X crop factor, compared to the full-frame image in the second figure, results in a short telephoto effect, roughly the same as if a 75mm lens were used on the full-frame camera.

Extreme Angles
Film’s “sensors” consist of tiny light-sensitive grains embedded in several different layers. These grains respond about the same whether the light strikes them head on or from a slight or extreme angle. The angle makes a difference, but not enough to degrade the image.

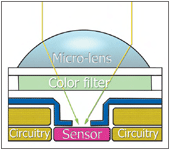
As you learned in in Digital SLR Technology section, sensors consist of little pixel-catching wells in a single layer. Light that approaches the wells from too steep an angle can strike the side of the well, missing the photosensitive portion, or stray over to adjacent photosites. This is potentially not good, and can produce light fall-off in areas of the image where the incoming angles are steepest, as well as moiré patterns with wide-angle lenses.

Fortunately, the camera vendors have taken steps to minimize these problems. The phenomenon is more acute with lenses with shorter back-focal distances, such as wide-angles. Because the rear element of the lens is so close to the sensor, the light must necessarily converge as a much sharper angle. Lens designs that increase the back-focal distance (more on this later) alleviate the problem. With normal and telephoto lenses that have a much deeper back-focal distance anyway, the problem is further reduced.

Another solution is to add a microlens atop each photosite to straighten out the optical path, reducing these severe angles. Next figure (which originally appeared in Digital SLR Technology section) shows how such a microlens operates. Newer cameras employ such a system, so you can use lenses designed for either film or digital use without worry.

A pattern of microlenses above each photosite corrects the path of the incoming photons

Olympus’s clever Four-Thirds design is perhaps the best approach. Although the overall concept was developed in conjunction with Fuji and Kodak, Olympus is the first vendor to bring the Four-Thirds approach to a digital SLR. The company’s dSLRs and their lenses were designed from scratch for use with digital sensors that measure 22.5mm diagonally. So, the camera was designed with a longer back-focal distance to mate with lenses that had a matching back-focal distance. Even the Olympus wide-angle optics focus the light at an angle that is more friendly to the digital sensor’s needs.

Reflections
If you’ve ever looked at film, you noticed that the emulsion side—the side that is exposed to light—has a relatively matte surface, due to the nature of the top antiabrasion coating and the underlying dyes. Take a glance at your sensor, and you’ll see a much shinier surface. It’s entirely possible for light to reflect off the sensor, strike the back of the lens, and end up bouncing back to the sensor to produce ghost images, flare, or other distortions. While lens coatings can control this bounce-back to a certain extent, digital camera lenses are more prone to the effect than lenses used on film cameras.

Lens Designs
You can understand why designing lenses for digital SLRs can become extremely complex if you know a little about how lenses are created. Although typical dSLR lenses contain many elements in several groups, I’m going to explain some basic principles using just a minimal number of pieces of glass.

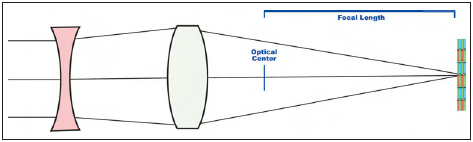
Next figure shows a simple lens with one positive element. This is known as a symmetrical lens design because both halves of the lens system are mirror images. The optical center of this lens is in the center of the single element, and the distance from the center to the focal plane (in this case, the sensor) is the same as the focal length of the lens. Assuming it’s a 75mm lens, that distance, the back-focus distance, would be 75mm, or about 3 inches. All you’d need to do to use this configuration would be to design a lens that positioned the single lens element at 75mm to bring the lens into sharp focus.

In a simple lens, the optical center is in the center of the element or group

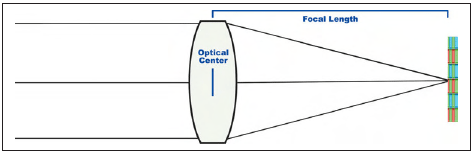
Things get more complicated when you start designing a longer lens. With a 500mm optic, you’d need to design the lens so the optical center was 20 inches from the sensor. That would be quite a long lens! Indeed, so called mirror lenses exist that use a series of reflecting surfaces to fold this long optical path to produce a lens that is much shorter for its particular focal length.

But there’s another way, through the use of an asymmetrical lens design. Place a negative lens element behind the positive element, spreading the incoming light farther apart again, causing the photons to converge farther from the optical center than they would otherwise, as you can see in the figure below. The negative element has the effect of lengthening the effective focal length and moving the optical center in front of the front element of the lens. The result: a “shorter” telephoto lens.

A telephoto lens uses a negative element to move the optical center out in front of the lens

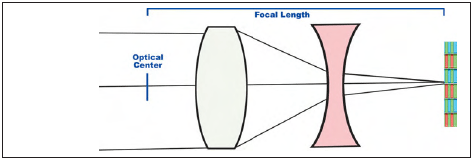
With wide-angle lenses, we have the reverse problem. The photons focus too close to the rear of the lens, creating a back-focus distance that’s so short that it doesn’t allow room for the mirror. Without the mirror to worry about, it wouldn’t matter if some of the elements of a wideangle lens extended far into the camera body, very close to the focal plane itself. Indeed, that’s the arrangement found in rangefinder cameras (which have no mirror) and with some lenses from the dark ages (like my 7.5mm fish-eye), which was viable on an SLR only if the mirror was locked up out of the way.

The solution here is to create an inverted telephoto lens, usually called retro-focus, which inserts the negative lens element ahead of the positive element, spreading the beam of light so that when the positive lens element focuses it again on the sensor, the focal point is much farther back than it would be otherwise. The optical center has been moved behind the center of the lens, as you can see in the next figure.

A retro-focus design solves the back-focus distance problem by moving the optical center behind the lens, increasing the distance between the lens and the focal plane

You can see that an inverted telephoto design helps digital camera lens designers produce wideangles that are physically “longer” than their focal lengths, just as the traditional telephoto configuration produced lenses that were physically “shorter” than their focal lengths. Unfortunately, these more complex lens designs lead to undesired effects in both telephoto and wide-angle lenses. A primary symptom is chromatic aberration, or the inability of a lens to focus all the colors of light at the same point, producing a color fringing effect. This color effect is caused by the glass’s tendency to refract different colors of light in different ways, much like a prism. There are actually two types of chromatic aberration: axial (in which the colors don’t focus in the same plane) and transverse, in which the colors are shifted to one side. The partial cure is the use of low diffraction index glass (given an ED code by Nikon, and UD by Canon), which minimizes the effect.

Other ailments include barrel distortion, which is a tendency for straight lines to bow outwards, and various spherical aberrations. Lens designers have countered with aspherical lens elements. As you might guess, aspherical optics are lenses with a surface that is not a cross-section of a sphere. These lenses are precisely ground (or, more recently in some consumer cameras, molded) to the required shape, and do a good job of correcting certain kinds of distortion.

Note that none of the lens designs I’ve cited are exclusive to digital SLR cameras. Such lenses can be developed for any sort of camera, but some of their characteristics come in particularly handy in the dSLR realm.

If It Ain’t Bokeh, Don’t Fix It
Lens Lust isn’t the only malady that can befall a new dSLR owner. Another illness is the search for the perfect bokeh. The term has almost become a buzzword, and is used to describe the aesthetic qualities of the out-of-focus parts of an image, with some lenses producing “good” bokeh and others offering “bad” bokeh. Boke is a Japanese word for “blur,” and the h was added to keep English speakers from rhyming it with broke.

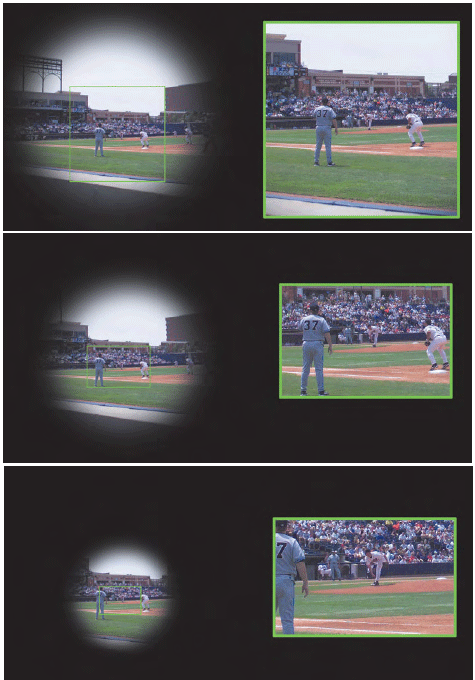
You’ve probably noticed that out-of-focus points of light become disks, which are called circles of confusion. These fuzzy discs are produced when a point of light is outside the range of an image’s depth-of-field. Most often, circles of confusion appear in close-up images, particularly those with bright backgrounds, as shown in the figures below (the upper left). The circle of confusion is not a fixed size, nor is it necessarily always a perfect circle. The viewing distance and amount of enlargement of the image determine whether we see a particular spot on the image as a point or as a disc. The shape of the lens’s diaphragm can determine whether the circle is round, nonagonal, or some other configuration.

The quality of those disks of out-of-focus light in the background determines a lens’s bokeh (top left), Light edges around the out-of-focus disks reveal the worst kind of bokeh (top right), Good bokeh (bottom left), neutral bokeh (bottom middle), and bad bokeh (bottom right)

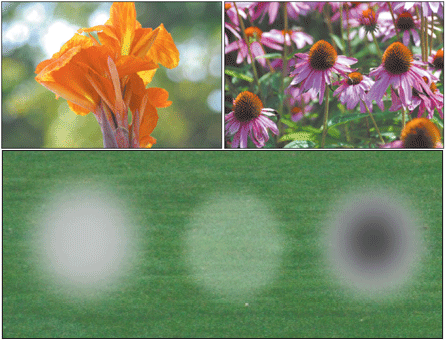
Good bokeh and bad bokeh derives from the fact that some of these circles are more distracting than others. Some lenses produce a uniformly illuminated disc. Others, most notably mirror or catadioptic lenses, produce a disk that has a bright edge and a dark center, producing a “doughnut” effect, which is the worst from a bokeh standpoint. Lenses that generate a bright center that fades to a darker edge are favored because their bokeh allows the circle of confusion to blend more smoothly with the surroundings.

Evenly illuminated disks, or, worst of all, those with lighter edges (like those of a mirror lens) are undesirable. If you look carefully at upper right's figure, you can detect some bokeh of the most objectionable sort. The bokeh characteristics of a lens are most important when you are using selective focus (say, when shooting a portrait) to deemphasize the background, or when shallow depth-of-field is a given because you’re working with a macro lens, long telephoto, or with a wide-open aperture. The lower figure shows what the three general varieties of bokeh look like when captured and isolated from their native habitats so you can see them more clearly.

Back to top

Understanding Lens Requirements

You’ve got a little background in lenses now, and you’re ready to learn exactly what you should be looking for when choosing lenses for your digital SLR. After all, the lenses you own affect the quality of your images as well as the kinds of pictures you can take. The most important factors in choosing a lens are the quality of the lens, the resolution of the images it produces, the amount of light it can transmit (that is, its maximum lens opening), its focusing range (how close you can be to your subject), and the amount of magnification (or zooming, in a zoom lens) that it provides. Here are some of the things you should consider.

Image Quality
If you’re graduating from a digital point-and-shoot camera, one of the first things you notice is how concerned your colleagues are over lens sharpness. Most point-and-shooters don’t worry about it that much because there is little they can do about it other than purchasing another camera. The lens on a non-SLR is what it is; it may be sharp or it may be less sharp, and that’s it. The situation is similar to the horsepower question in an econobox automobile. Horsepower is not what you purchased the vehicle for. You’d be more interested in engine power if you had a sports car that, perhaps, could be souped up a little with some aftermarket components. Lenses are the dSLR’s primary aftermarket component. If you frequent the dSLR newsgroups and forums, you’ll notice the attention paid to how sharp a particular lens is. Visit any such venue and you’ll find multiple postings inquiring about the resolution of this lens or that lens, and whether it has good or bad bokeh. A good rule of thumb is that most general purpose lenses produce good enough image quality for general purpose shooting. When you start to get into specialized areas—ultrawide lenses, extra long telephotos, super-fast optics with large f-stops—the compromises necessary to produce those expensive toys sometimes involve compromises in image quality. If you’re contemplating one of these lenses, it’s a good idea to read the magazines and Web sites that have formalized, standard testing, and check around among your friends, colleagues, and others who can provide you with tips and advice.

Lens Aperture
If you’re a veteran SLR user, you know all about lens apertures. If not, you need to know that the lens aperture is the size of the opening that admits light to the sensor, relative to the magnification or focal length of the lens. A wider aperture lets in more light, allowing you to take pictures in dimmer light. A narrower aperture limits the amount of light that can reach your sensor, which may be useful in very bright light. A good lens will have an ample range of lens openings (called “f-stops) to allow for many different picture-taking situations. You generally don’t need to bother with f-stops when taking pictures in automatic mode, but we’ll get into apertures from time to time in this book. For now, the best thing to keep in mind is that for digital photography a lens with a maximum (largest) aperture of f2 to f2.8 is “fast” while a lens with a maximum aperture of f8 is “slow.” If you take many pictures in dim light, you’ll want a camera that has a fast lens.

Zoom lenses tend to be slower than their prime lens (non-zooming) counterparts. That’s because digital optics are almost always zoom lenses, and zoom lenses tend to have smaller maximum apertures at a given focal length than a prime lens. For example, a 28mm non-zoom lens for a 35mm camera might have an f2 or f1.4 maximum aperture. Your digital camera’s zoom lens will probably admit only the equivalent of f2.8 to f3.5, or less, when set for the comparable wide-angle field-of-view.
The shorter actual focal length of digital camera lenses when used with cameras that have a lens multiplier factor also makes it difficult to produce effectively large maximum apertures. For example, the equivalent of a 28mm lens on a full-frame camera with a camera having a smaller 1.6X multiplier sensor is an 18mm lens. There’s a double-whammy at work here.
Although providing the same field-of-view as a 28mm wide-angle, the 18mm optic has the same depth-of-field as any 18mm lens (much more than you’d get with a 28mm lens). Worse, the mechanics of creating this lens complicates producing a correspondingly wide maximum f-stop. So, while you might have used a 28mm f2 lens with your film camera with a workable amount (or lack) of depth-of-field wide open, you’ll be lucky if your 28mm (equivalent) digital camera lens has an f-stop as wide as f4. That increases your depth-of-field at the same time that the actual focal length of your wide angle (remember, it’s really an 18mm lens) is piling on even more DOF.

What about the minimum aperture? The smallest aperture determines how much light you can block from the sensor, which comes into play when photographing under very bright lighting conditions (such as at the beach or in snow) or when you want to use a long shutter speed to produce a creative blurring effect. Digital cameras don’t have as much flexibility in minimum aperture as film cameras, partly because of lens design considerations and partly because the ISO 100 speed of most sensors is slow enough that apertures smaller than f22 or f32 are rarely needed. A digital camera’s shutter can generally reduce the amount of exposure enough. So, your lens probably won’t have small f-stops because you wouldn’t get much chance to use them anyway. If you do need less light, there are always neutral density filters.
Of course, as I will point out in the next section, while smaller apertures increase depth-of-field, there are some limitations. In practice, a phenomenon known as diffraction reduces the effective sharpness of lenses at smaller apertures. A particular lens set at f22 may offer significantly less overall resolution than the same lens set at f5.6, even though that sharpness is spread over a larger area.

Zoom Lenses
A zoom lens is a convenience for enlarging or reducing an image without the need to get closer or farther away. You’ll find it an especially useful tool for sports and scenic photography or other situations where your movement is restricted. Only the least-expensive digital non-SLR cameras lack a zoom lens. Some offer only small enlargement ratios, such as 2:1 or 3:1, in which zooming in closer produces an image that is twice or three times as big as one produced when the camera is zoomed out. More-expensive cameras have longer zoom ranges, from 4:1 to 10:1 and beyond.
Digital SLRs, of course, can be fitted with any zoom lens that is compatible with your particular camera, and you’ll find a huge number of them in all focal length ranges and zoom ratios.
There are wide-angle and wide-angle-to-short telephoto zooms, which cover the range of about 18mm to 70mm (35mm equivalent), short telephoto zooms from around 70mm to 200mm (equivalent), high-power zooms in the 80mm to 400mm range, and lenses that confine their magnifications to the long telephoto territories from about 200mm to 600mm or more. Digital SLRs generally rely solely on what is now called optical zoom, the relationship of the individual elements of the lens are changed to produce the changes in magnification. Because the lens elements can be finely tuned, this produces the sharpest image at each lens magnification. For example, a typical zoom might be described as having 10 elements in eight groups. Each of the groups can be moved individually to provide the desired magnification and the best image. The optical science behind these relationships is complex, and we should be thankful that our spanking-new digital cameras have 50 years or more of research backing the optical component.
Thankfully, dSLR owners are spared the problems caused by that feature-without-portfolio found in point-and-shoot cameras: the digital zoom, in which the apparent magnification is actually produced simply by enlarging part of the center of the image. I tend to think of digital zoom as a feature-turned-bug (the exact opposite of a bug that’s promoted as a useful feature).
Digital zoom is less sharp than optical zoom. Indeed, you can invariably do a better job by simply taking the picture at a point-and-shoot camera’s maximum optical zoom setting and enlarging the image in your image editor.
Because the elements of a lens are moving around in strange and mysterious ways, the effective aperture and focus of a lens may vary as the magnification settings change. A lens that has an f2.8 maximum aperture at its wide angle setting may provide only the amount of light admitted by an f3.5 lens at the tele position. Focus can change, too, so when you focus at, say, the wide-angle position and then zoom in to a telephoto view, the original subject may not technically still be in sharpest focus (although the huge amount of depth-of-field provided by digital camera lenses may make the difference impossible to detect). You’d notice the differences only when using the camera in manual exposure or focusing mode, anyway. When set to autofocus and autoexposure, your camera will provide the optimum setting regardless of zoom magnification.

Focusing
The ability to focus close is an important feature for many digital camera owners. One of the basic rules of photography is to get as close as possible and crop out extraneous material. That’s particularly important with digital cameras because any wasted subject area translates into fewer pixels available when you start cropping and enlarging your image. So, if you like taking pictures of flowers or insects, plan to photograph your collection of Lladró porcelain on a tabletop, or just want some cool pictures of your model airplane or stamp collections, you’ll want to be able to focus up close and personal.
What’s considered close can vary from model to model; anything from 12 inches to less than an inch can be considered “close-up,” depending on the vendor. Fortunately, those short focal length lenses found on digital cameras come to the rescue again. Close focusing is achieved by moving the lens farther away from the sensor (or film) and an 18mm wide-angle lens doesn’t have to be moved very far to produce an image of a tiny object that fills the viewfinder. You’ll find more about macrophotography in the next chapter.

Add-On Attachments
Photographers have been hanging stuff on the front of their lenses to create special effects for a hundred years or more. These include filters to correct colors or provide odd looks, diffraction gratings and prisms to split an image into pieces, pieces of glass with Vaseline smeared on them to provide a soft-focus effect, and dozens of other devices. These range from close-up lenses to microscope attachments to infrared filters that let you take pictures beyond the visible spectrum. Add-on wide-angle and telephoto attachments are also available, along with slidecopy accessories and other goodies. If you’re serious about photography, you’ll want to explore these options.
Unfortunately, dSLRs come with lenses that have all different sizes of filter threads. One of Nikon’s strong selling points in olden times was that virtually all its general purpose lenses used a 52mm filter thread, so you could invest hundreds of dollars in filters and add-ons and be able to use them with a whole range of optics. Of course, a 52mm thread size is hardly practical for modern dSLR lens designs. You’re more likely to need 62mm accessories for many of your lenses, probably will require 67mm add-ons for many of them, and needn’t be surprised if your faster lenses, longer zooms, and widest optics require 72mm or 77mm filters.

Of course, you won’t want to choose a lens based on its filter thread, but it’s a good idea to look at how you plan to use your lenses before purchasing filters. If only one of your lenses requires a 72mm filter, but the lenses you use most use 62mm and 67mm filters, you might want to standardize on 67mm filters and use a step-down ring to mount those same filters on the lenses that accept 62mm accessories. Buy only those 72mm filters you actually need. Filters are so much more expensive in the larger sizes that you probably won’t need much prompting to make your plans carefully.

Construction Quality
The final consideration when choosing a lens is the quality of its construction. See if the key lens components are made of metal or plastic. Believe it or not, some lower-cost lenses have mounts that are made of non-metallic components. They’re less sturdy, and more likely to wear if you attach and detach them from your camera often.

Also check for play in the focusing and zooming mechanisms. You don’t want any looseness, stickiness, odd noises, or other qualities that signify cheap or poor construction. Your investment in lenses will probably exceed your cost for your digital camera body after a few months, so you want your lenses to hold up under the kind of use and abuse you’ll subject them to.
Remember that, most likely, the lenses you purchase after each bout with Lens Lust will probably work just as well with your next dSLR as with your current model, so you can consider them a long-term investment.

Back to top
Why is dSLR ?
Digital SLR Technology
Mastering Your dSLR Controls
Quircks and Strength
Working with RAW
Working wth Lenses
TradeBonanza
Close Up Photography
Capturing Action
Composition
Special Features
Introduction | TradeBonanza | Site Map | Resources
@2006 Copyright www.digitalslrphotography.50.webs Mastering Digital SLR Photography